How To Automate Data Entry & Lead Generation Using Dumpling AI, ChatGPT and Make.com
In today’s fast-paced business environment, automating repetitive tasks like data entry and lead generation can significantly enhance productivity. This tutorial will walk you through creating a workflow on Make.com that automates the process of scraping data from a website, extracting relevant contact information using Dumpling AI, OpenAI’s GPT-4, and storing that data in Airtable for easy access and further use.
This automation is particularly useful for businesses looking to streamline their lead generation process by extracting and organizing contact information from directories, websites, or other online sources.
Step 1: Setting Up the Web Scraper
- Create a New Scenario:
- Begin by logging into your Make.com account and creating a new scenario. A scenario is essentially a workflow that automates a series of tasks.
- Click the “+” icon to add your first module.
- Add the Web Scraper Module:
- Module Selection: Search for the Dumpling AI: Scrape URL module. This module allows you to extract data from web pages.
- Configure the Scraper:
- Connection: If you haven’t connected Dumpling AI before, you’ll need to add a connection. Follow the prompts to authenticate your account.
- URL: Input the URL of the website you want to scrape. For this tutorial, we’ll use https://www.morrochamber.org/list/category/real-estate-23, a directory of real estate businesses.
- Format: Choose Markdown as the output format. Markdown will strip out most of the HTML, making the data easier to work with.
- Cleaned: Set this to true to remove any residual HTML tags, ensuring that the scraped data is clean and ready for processing.

Explanation: In this step, we’re setting up a scraper to extract all visible content from a specific webpage. This content will later be processed to extract meaningful contact details.
- Test the Scraper:
- After configuring the module, save it and run the scenario. Ensure that the module successfully retrieves data from the specified URL.
Step 2: Extracting Contact Details Using OpenAI
- Add the OpenAI GPT-4 Turbo Module:
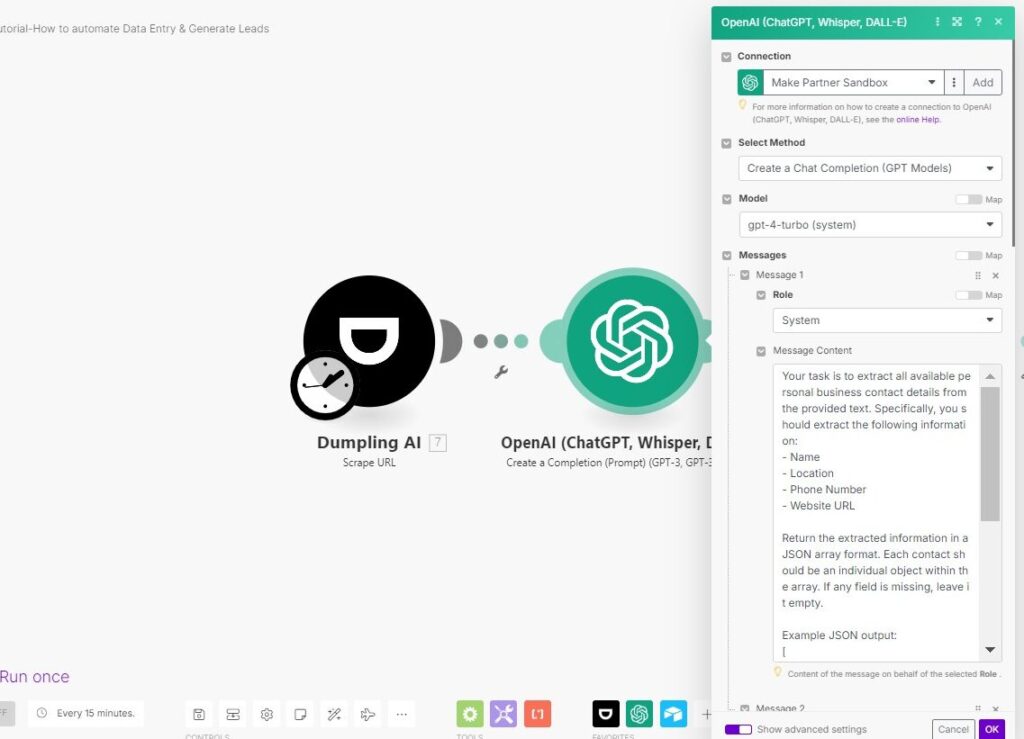
- Module Selection: Click the “+” icon again to add another module. Search for the OpenAI GPT-4 Turbo: Create Completion module. This module will use AI to extract specific information from the text scraped in the previous step.
- Configure the OpenAI Module:
- Connection: Select or add your OpenAI connection.
- Model: Choose gpt-4-turbo. This model is designed to handle complex tasks and generate detailed, accurate responses.
- Select Method: Set this to chat. The chat method allows you to provide a context or system message, guiding the AI to perform the task correctly.
- Max Tokens: Set this to 0 as we are not directly limiting the response length in this context.
- Temperature: Set the temperature to 1 for creative responses. A higher temperature can generate more varied and imaginative outputs.
- Top P: Leave it at 1, which keeps the most probable tokens in the output.
- Response Format: Turn on the advanced settings and choose JSON Object. This ensures that the extracted information is structured and easy to map to your Airtable fields.
- Messages: Add a system message that instructs the AI to extract the contact details.
- Example System Message:{
“role”: “system”,
“content”: “Your task is to extract all available personal business contact details from the provided text. Specifically, you should extract the following information: Name, Location, Phone Number, Website URL. Return the extracted information in a JSON array format.”

Test the Extraction:
- Save and run the scenario to see how OpenAI processes the scraped data and extracts the contact details.
- The output should be a JSON array containing objects with fields like name, location, phone_number, and website_url. Review the output to ensure that the extraction is accurate.
Step 3: Iterating Through Multiple Entries
- Add the Iterator Module:
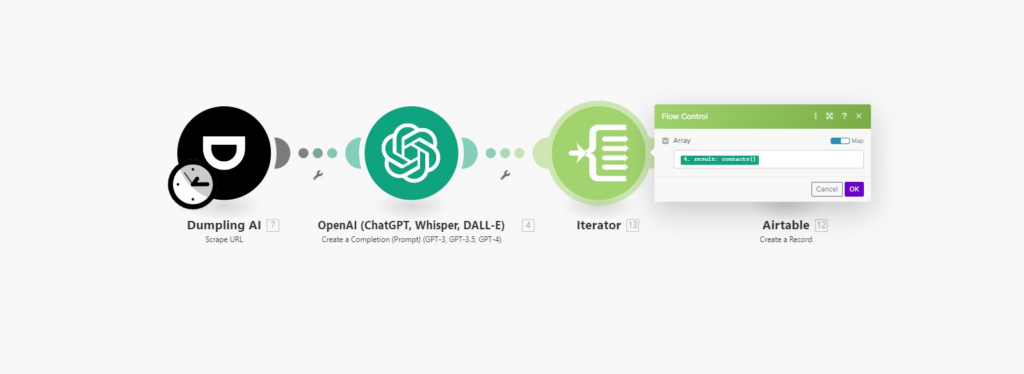
- Module Selection: Click the “+” icon to add an Iterator module, which will allow the scenario to process each entry in the JSON array individually.
- Configure the Iterator:
- Source Array: Set the source array to the output from the OpenAI module, which contains the JSON array of contact details.
Explanation: The iterator breaks down the JSON array into individual objects, allowing the scenario to process each contact one by one. This step is essential when you’re dealing with multiple entries.
Test the Iterator:
- Run the scenario to confirm that the iterator correctly breaks the array into individual items.
- Check the output to ensure each contact is processed separately.

Step 3: Saving Data to Airtable
- Add the Airtable Module:
- Module Selection: Click the “+” icon to add the final module. Search for the Airtable: Create Record module. This module will insert the extracted data into your Airtable base.
- Configure the Airtable Module:
- Connection: Select or add your Airtable connection.
- Base: Choose the Airtable base where you want to store the data. If you haven’t created a base yet, you’ll need to do so in Airtable.
- Table: Select the table within the base where the data should be recorded.
- Record Fields: Map each field from the extracted JSON data to the corresponding fields in your Airtable table. For example:
- Name: {{13.name}}
- Location: {{13.location}}
- Phone Number: {{13.phone_number}}
- Website URL: {{13.website_url}}
Explanation: In this step, we map the structured data provided by OpenAI into Airtable fields. This turns raw data into a searchable, organized database that can be used for follow-ups, marketing, or sales activities.
- Test the Data Entry:
- Save and run the scenario. Check your Airtable base to ensure that the data has been correctly inserted.
- Verify that all fields are populated correctly, and the data appears as expected.
Step 5: Finalizing and Automating
- Test the Entire Scenario:
- Run the entire scenario from start to finish to ensure all steps work together seamlessly.
- If you encounter any issues, review the configurations of each module and adjust as necessary.
- Schedule the Scenario:
- Once you’re satisfied with the workflow, schedule the scenario to run at regular intervals (e.g., daily or weekly) to continuously scrape new data, extract contact details, and update your Airtable base.
- Activate the scenario to start automating the process.
Conclusion
By incorporating the iterator step, this tutorial ensures that your automation can handle multiple entries efficiently. The scenario you’ve created not only saves time but also ensures that your lead generation process is consistent, accurate, and automatically updated. This automation is a powerful tool for any business looking to optimize their data entry and lead management efforts.
Get the Blueprint Featured in This Guide
Access the full blueprint here to get started on setting up this automation effortlessly!


