How To Automate Employee Onboarding Process in Make.com
In this tutorial, we’ll walk you through how to automate your freelancer onboarding process using Airtable, Make.com, and PandaDoc. This setup allows you to easily manage contracts, generate and send Non-Disclosure Agreements (NDAs), and automatically update your Airtable base once the documents are signed.
Step 1: Airtable Setup – Freelancer Contracts
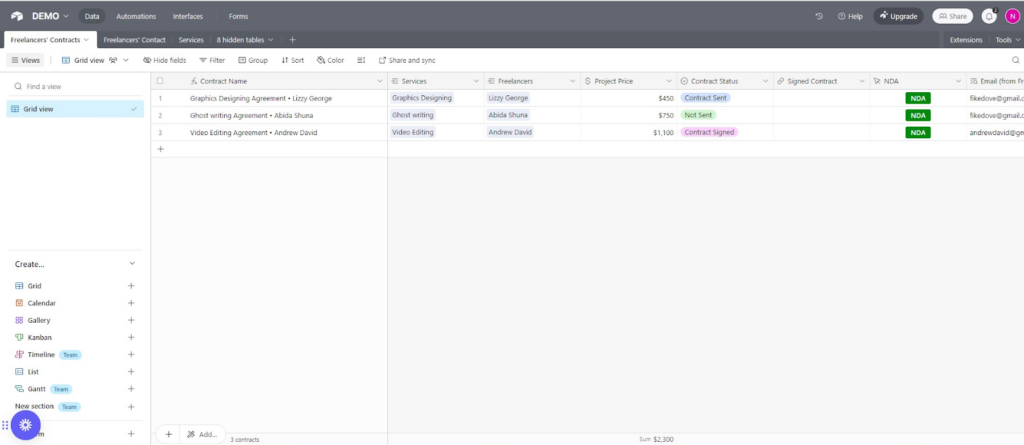
Before setting up the automation in Make.com, the process starts with Airtable. Airtable is used to manage all employee (freelancer) contract details, including their contact information, project price, contract status, and NDA status. Here’s how it’s structured:
Setting up Airtable
- Create a Base in Airtable
First, create a new base in Airtable called “Demo” to manage employee contracts. You can create a table to track contracts, freelancers, and contract statuses. - Setting up Fields in Airtable: For this process, we will be setting up three Tables: Freelancer Contract Table, Freelancer’s contact table and the Service Table. Here is a basic structure for table:
- Contract Name: Name of the contract.
- Services: The type of service being contracted.
- Freelancers: Link To record of the Freelancer’s contact Table, we will call it freelancer’s name.
- Project Price: Price of the project.
- Contract Status: Tracks if the contract is sent, signed, or not sent.
- Creating the NDA Button
- Click “Customize field type” and select the button field type.
- Name it “NDA” and link it to a URL that connects to a webhook you will create in Make.Here is the formula used:”https://hook.make.com/your-webhook-url?recordId=” & RECORD_ID()
- Email (from Freelancer): A lookup field to the freelancers contact table
Freelancer’s contract Table:
Freelancer’s Contact Table:

Service Table:
Part 2: Connecting Airtable to Make (Webhook Trigger)
- Set up a Webhook in Make
- Log in to your Make.com account and create a new scenario.
- Add the Webhook module as the first step. This module will listen for the event when the “NDA” button in Airtable is clicked.
- Obtain Webhook URL
- When you add the webhook module, Make will generate a unique webhook URL.
- Copy this URL.
- Link Airtable Button to Webhook
- Go back to Airtable and edit the “NDA” button.
- Paste the Make webhook URL into the button’s configuration so that when the button is clicked, the data is sent to Make.
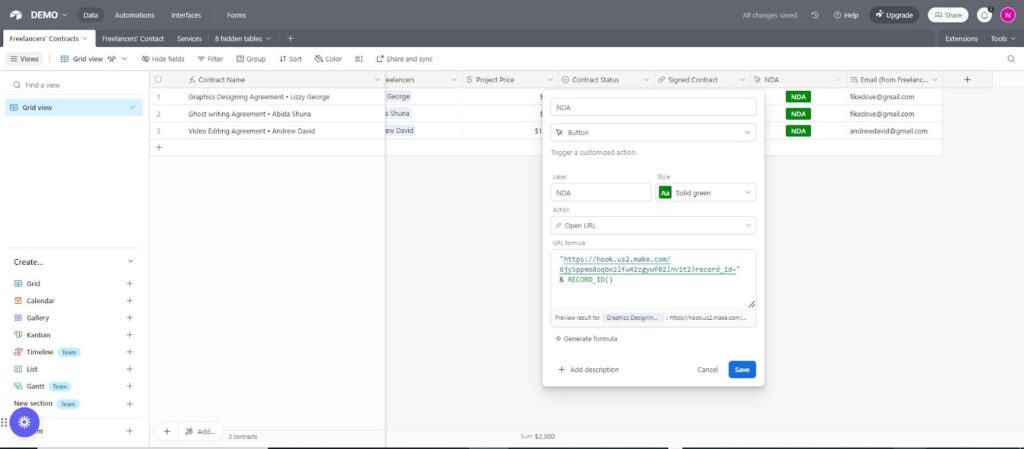
Finally, test the trigger by pressing the NDA button in Airtable. Once the button is clicked and accepted, this will authenticate the webhook in Make.com.
Next, run the scenario in Make.com to capture the record ID of the entry where the button was pushed. Once you have the record ID, you can proceed to the next step in the workflow.
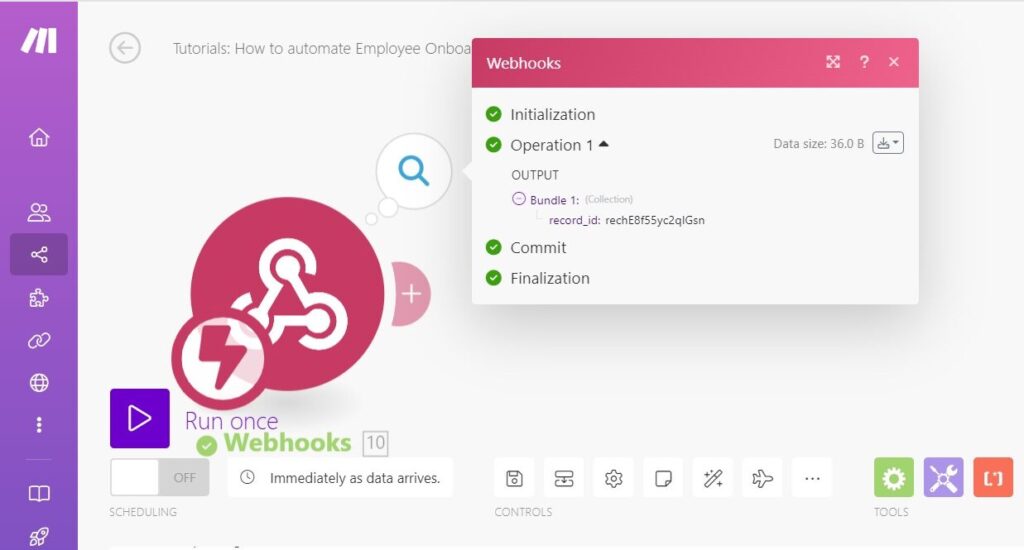
Step 2: Retrieve Employee Data from Airtable
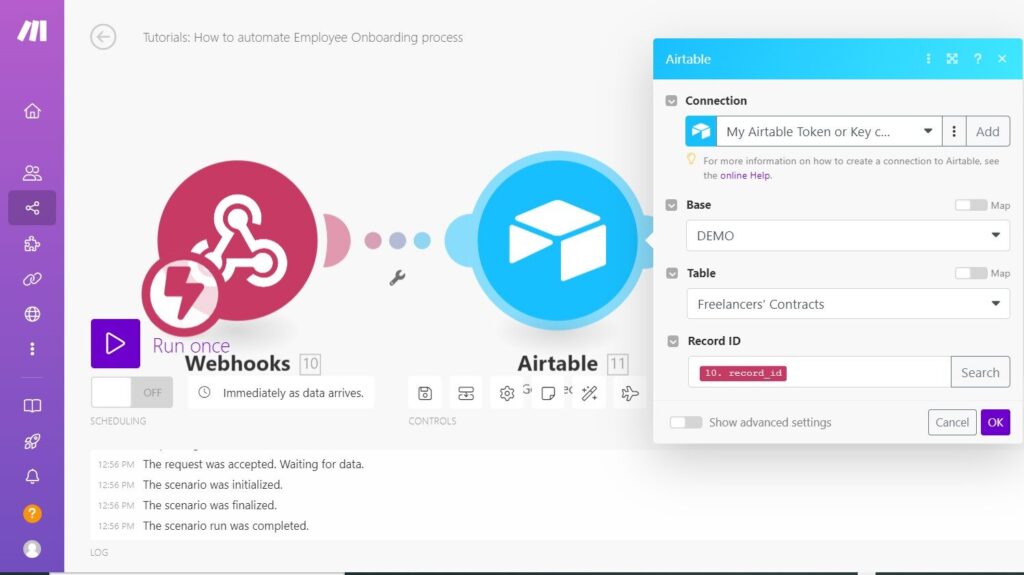
- Add an Airtable: Get Record module after the webhook.This step retrieves the specific record from Airtable where the button was clicked, allowing us to access the relevant data from Freelancer’s contract table.
- Connect your Airtable account if you haven’t already.
- Base: Select your Airtable base (e.g., DEMO).
- Table: Select the appropriate table for employee records (e.g., Freelancers’ Contracts).
- Record ID: Use the Record ID output from the webhook Module (i.e., {{10.record_id}}).
- Click OK to save.
Step 4: Generate and Send NDA Using PandaDoc
Add the “PandaDoc: Create a Document” module and connect your PandaDoc account if you haven’t already.
- Template: Choose the appropriate template for NDAs (e.g., NDA template, In this case we used Business plan). If you don’t have one yet, log in to your PandaDoc account and create a template according to your preferences.
- Map Fields: Map the fields in your PandaDoc template using the data retrieved from Airtable. Here’s how to do it:
- Document Name: Use the contract name from Airtable (e.g., {{11.Contract Name}}).
- Recipients: Input the freelancer’s email (e.g., {{3.Email}}).
- Personalize: Use tokens to personalize the document (e.g., Client name, Contract name).
- Message: Write a message to the freelancer that will accompany the NDA. This is because we are allowing PandaDoc to send the document on our behalf.
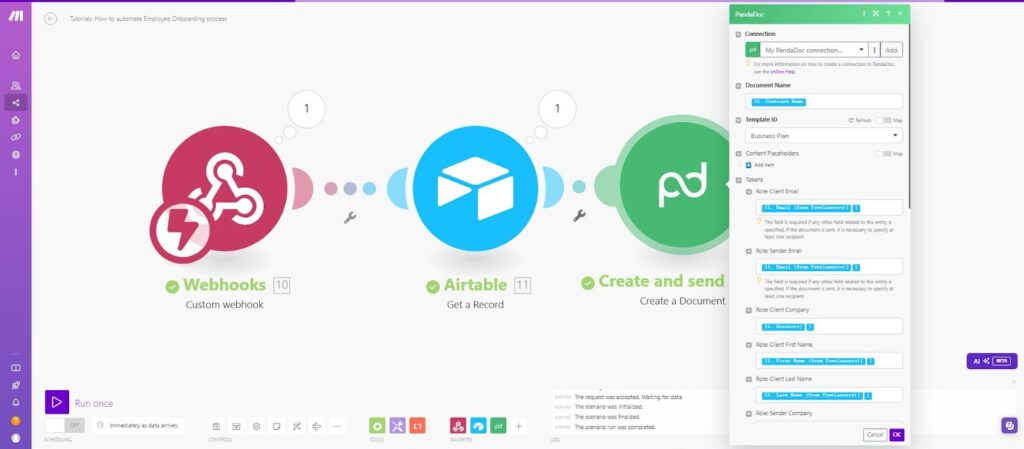
Click “OK” to save your configuration.
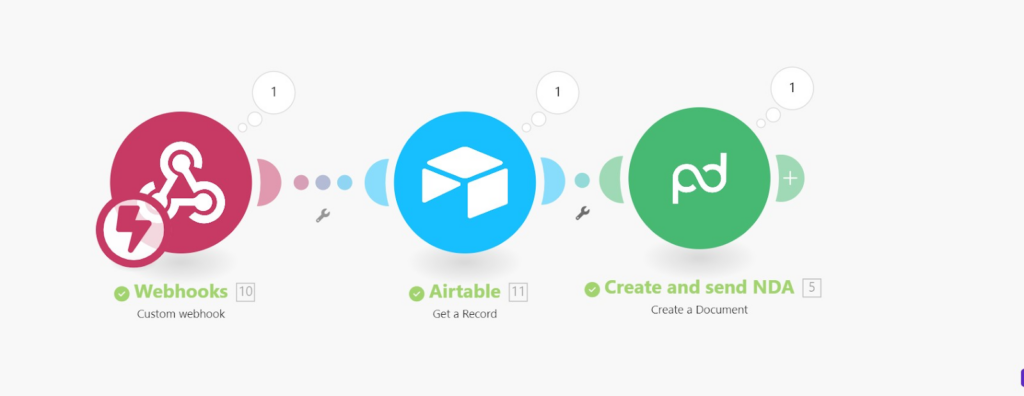
This First part of the process outlines the core steps for setting up an automated employee onboarding process using Make.com, Airtable, and PandaDoc. The webhook acts as the trigger, Airtable provides the employee details, and PandaDoc ensures the NDA is sent out efficiently.
Now,we proceed to the next step of the process of employee onboarding automation where the NDA is signed via PandaDoc, triggering a new process in Make.com.
Step 1: Watch for Signed Documents in PandaDoc
- Add the PandaDoc: Watch Documents module.This step watches for when the document(NDA) is signed.
- Connect your PandaDoc account.
- Webhook: Use the PandaDoc webhook to trigger the scenario when a document is signed. This ensures that whenever an NDA is signed, it starts the rest of the onboarding process automatically.
- Click OK to save.
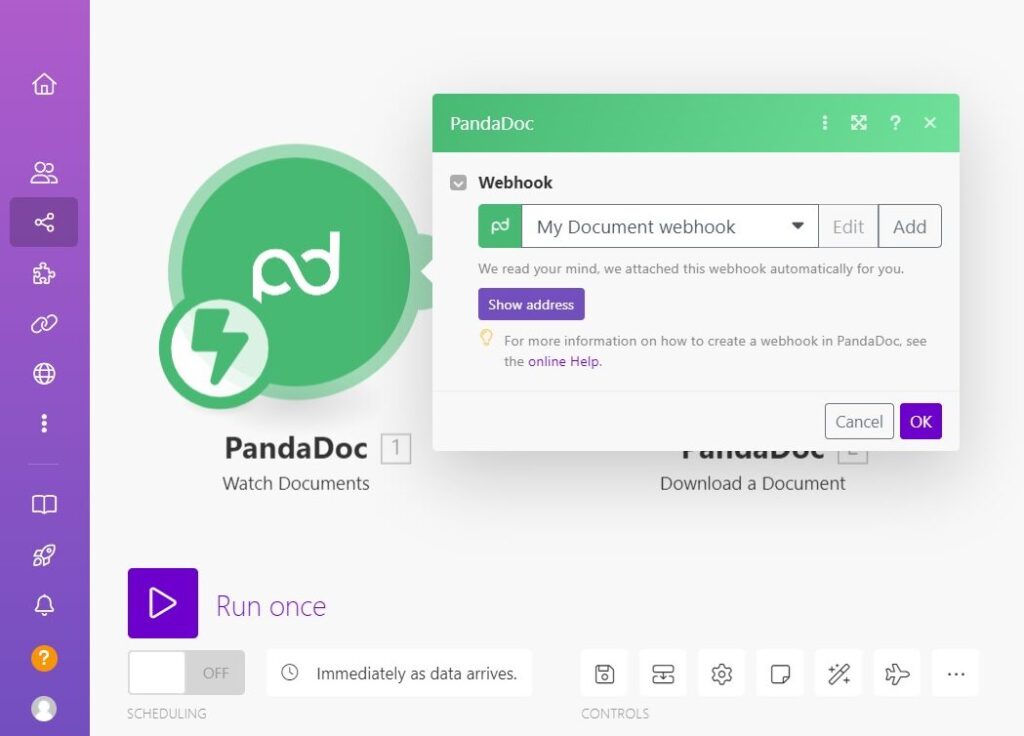
Step 2: Download the Signed NDA Document. In this step, we download the signed Non-Disclosure Agreement (NDA) document, which is necessary for uploading back into Airtable for each employee’s record.
- Add the PandaDoc: Download Document module after the webhook.
- Connection: Use the same PandaDoc connection.
- Document ID: Use the ID from the previous step (e.g., {{1.id}}), That is the watch document step , which refers to the signed NDA.
- Click OK to save.
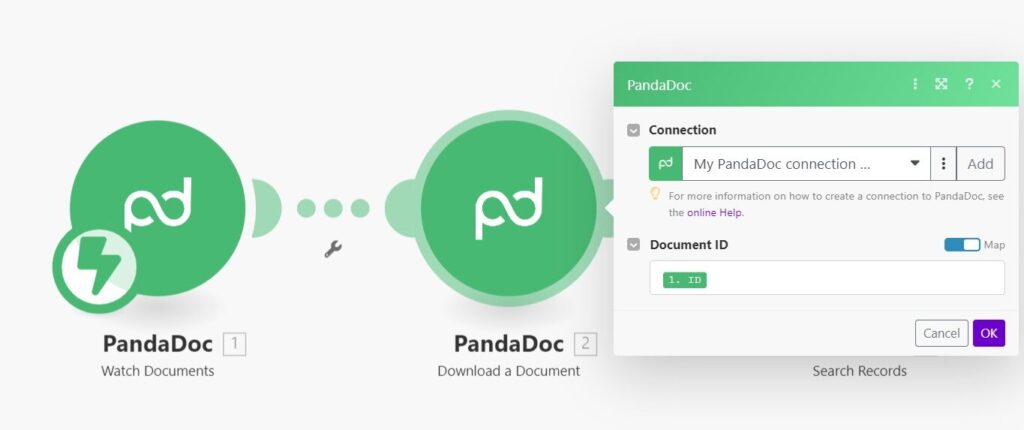
Step 3: Search for the Employee’s Contract Record in Airtable
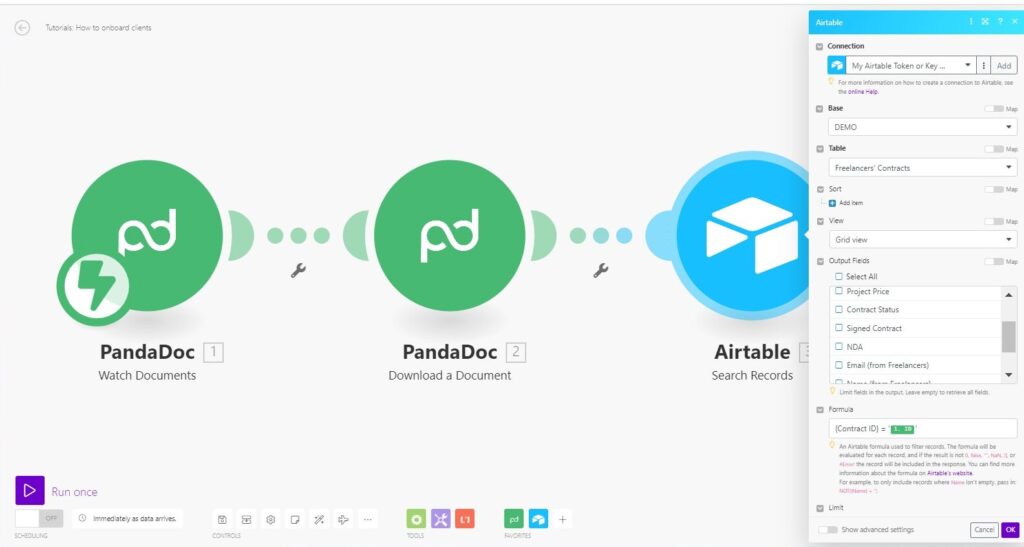
- Add an Airtable: Search Records module.This step is used to check if the freelancer already exists in your Airtable table, allowing you to attach the signed document from the previous step to the correct record.
- Connection: Connect your Airtable account if not already connected.
- Base: Choose the base where your employee contracts are stored (e.g., DEMO).
- Table: Select the table that contains employee contract information (e.g., Freelancers’ Contracts).
- Formula: Use the formula {Contract ID} = ‘{{1.id}}’ to search for the contract ID matching the signed NDA.
- Click OK to save.
Step 4: Update the Contract Status in Airtable
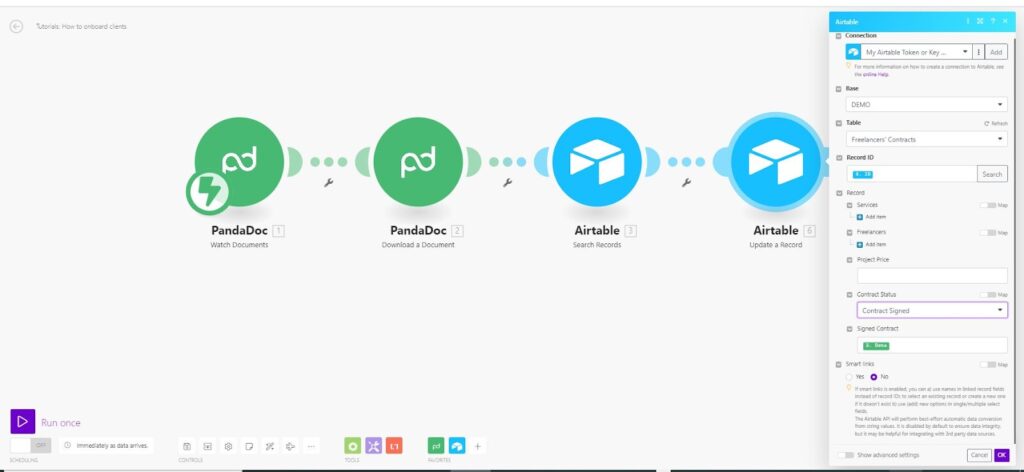
- Add an Airtable: Update Record module.We used this Module in Order to create an update in the Freelancer’s contract Table, we want to upload the signed Document and also update the Status of the employee(Freelancer)
- Connection: Use your Airtable connection.
- Base: Select the same base (DEMO).
- Table: Select the Freelancers’ Contracts table.
- Record ID: Use the record ID from the previous Airtable step (e.g., {{3.id}}).
- Contract Status: Set this to reflect the signed NDA (e.g., update the status to “Signed”).
- Signed Contract: Add the URL of the signed NDA document (you can retrieve this from the PandaDoc module output).
- Click OK to save.
Step 5: Test and Deploy the Scenario
- Save the scenario and run a test to ensure it triggers correctly when the NDA is signed.
- To test, sign a sample NDA via PandaDoc and check whether the scenario retrieves the document, updates the Airtable record, and changes the contract status.
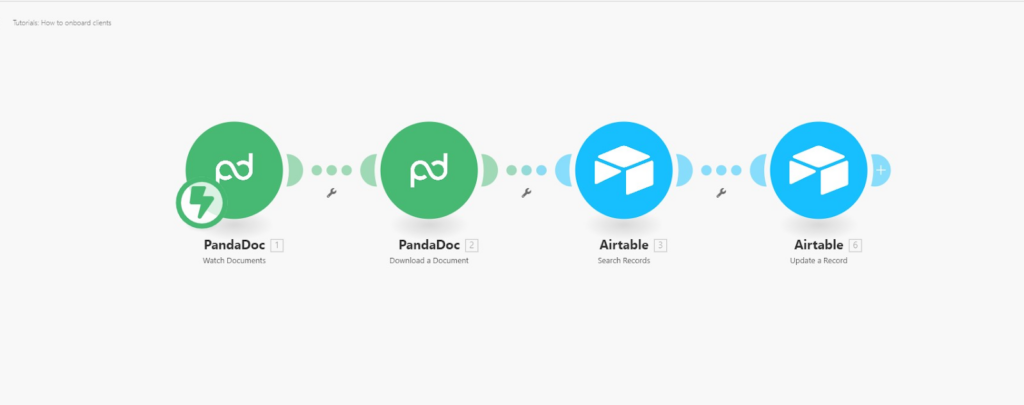
This completes the automation setup for employee onboarding, where signing the NDA automatically triggers the next steps. The integration ensures a seamless transition from contract signing to record updating in Airtable.
Get the Blueprint Featured in This Guide
Access the full blueprint here to get started on setting up this automation effortlessly!


