How to Create an Auto-Email Organizer Using Make.com
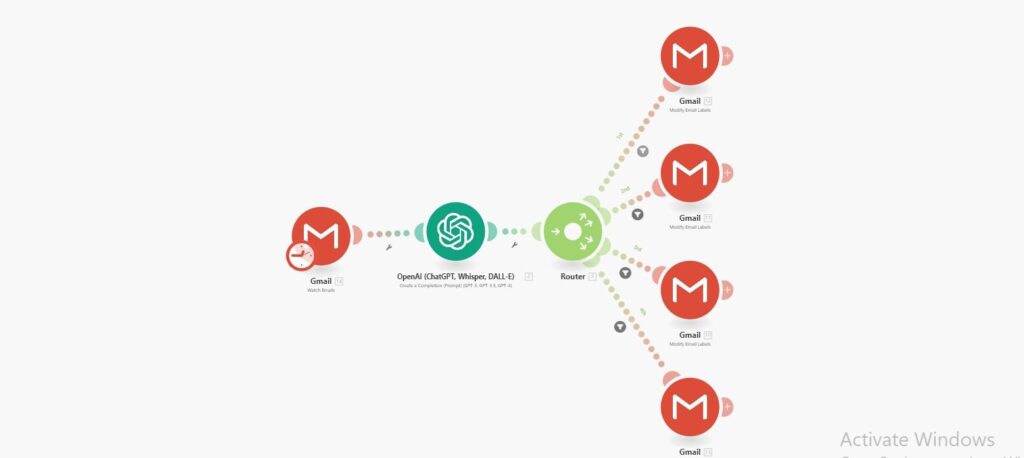
This tutorial will guide you through setting up an automation in Make.com that automatically categorizes incoming emails into different labels based on their content (e.g., Upwork, newsletter, important). We will be using Gmail and OpenAI in this automation.
Below is the step-by-step process.
Step 1: Set Up a New Scenario
- Go to your Make.com dashboard and create a new scenario.
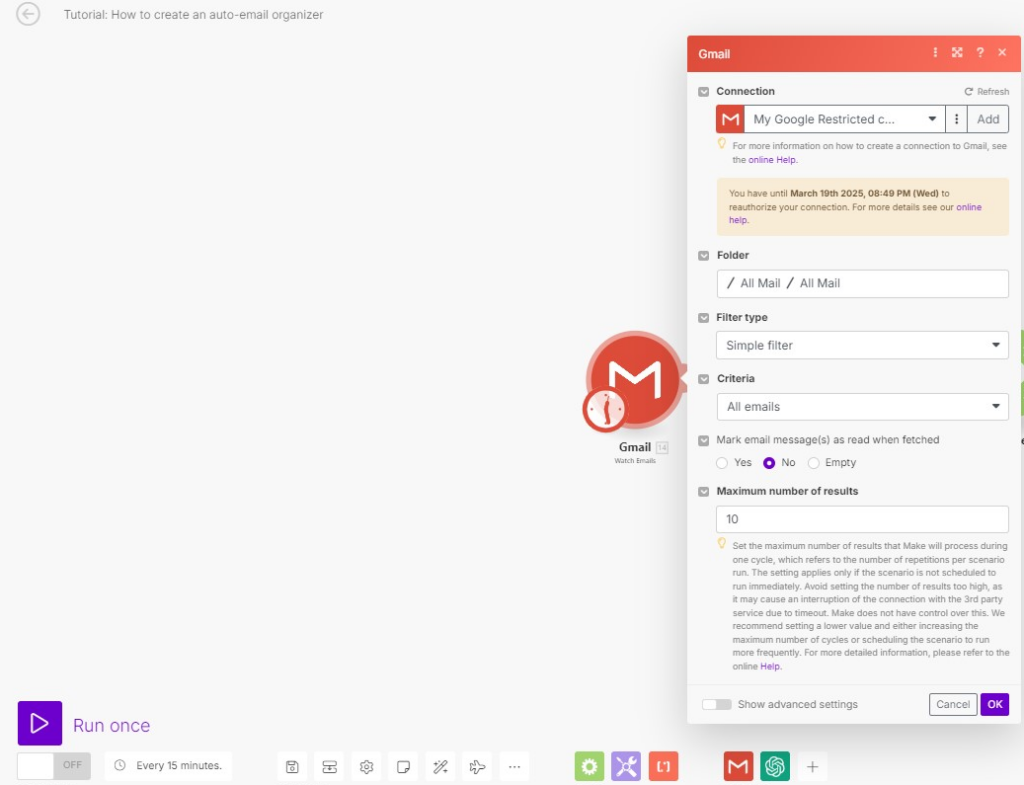
- Choose Google Mail as the app and select the Trigger New Email module.
- You will need to authorize your Google Mail account.
- Set the folder to [Gmail]/All Mail to capture all emails.
- Configure the criteria to “ALL” to capture every new email.
- Make sure to leave markSeen unchecked if you want to keep the emails unread.
- Set the maxResults to 10 or your preferred number of emails to retrieve at once.

Step 2: Add the ChatGPT Module
This step categorizes your emails into the specific labels you’ve set up.
- After setting up the email trigger, click on the plus sign and add the OpenAI – Create Chat Completion module.
- Connect your OpenAI account or create a connection.
- For the model, select gpt-4.
- Set temperature to 1 for more creative outputs.
- For messages, input the following prompt:Classify this email as either Upwork, newsletter, Important: {{14.text}}, map the text with the message content from the Gmail module.

Step 3: Create a Router
- Now, add a Router to split the workflow based on the classification results.
- Create different routes for each email category (e.g., Sales, Newsletter, Important).

Step 4: Add Label Modification Modules
In this step, you will configure different routes to automatically apply labels to emails based on how they are classified by ChatGPT. This will help categorize your emails into labels such as Sales, Newsletter, Important, or Upwork. For each route, you’ll use the GMail – Modify Labels module to assign the appropriate label to the email.
Here’s how to set up each route:
Route 1: Label Emails as Sales
- Add a Google Mail Module:
- After creating the first route, click on the plus icon and select GMail.
- Choose the Modify Labels module to modify the labels of an email.
- Configure the Module:
- Select your connected Google Mail account.
- In the Message ID field, map the email’s unique ID to the value provided by the email trigger. For this, use {{14.messageId}}. This ensures the label is applied to the correct email.
- In the Labels to Add field, select or create the Sales label to categorize emails related to sales inquiries.
- Set Up a Filter for Sales:
- Scroll down to the Filter section.
- Add a condition: Set {{2.result}} (the classification result from OpenAI) to contain “Sales” (case-insensitive).
- This will ensure that only emails classified as “Sales” by OpenAI are labeled as such.

Route 2: Label Emails as Newsletters
- Add Another Google Mail Module:
- Create a second route and add the Modify Labels module, just as you did in Route 1.
- Configure the Module:
- Select the same Google Mail account and map the Message ID to {{14.messageId}}.
- In the Labels to Add field, select the Newsletter label.
- Set Up a Filter for Newsletters:
- Add a filter to this route with the condition that {{2.result}} contains “newsletter” (case-insensitive).
- This ensures that any email classified as a newsletter by OpenAI is labeled accordingly.
Repeat this process for each branch of the Router.
Step 5: Test and Activate the Scenario
- Once you have set up the different routes, run the scenario in testing mode.
- Send test emails to ensure they are being classified correctly.
- If everything works as expected, activate the scenario.

Conclusion
With this setup, you now have an automated email organizer that classifies incoming emails based on their content using AI and applies the appropriate labels in Gmail.
Get the Blueprint Featured in This Guide
Access the full blueprint here to get started on setting up this automation effortlessly!


