How to build a lead generation automation using Dumpling AI’s AI Agent in Make.com.
In this tutorial, we’ll walk through creating a Lead Generation Automation in Make.com using Dumpling AI Agent builder. This automation retrieves records from Airtable, processes them with a Dumpling AI agent, and sends the results to the relevant contacts through Gmail. Each component is designed to streamline lead generation tasks, reducing manual work and enhancing efficiency.
By the end, you’ll have a fully operational workflow that automatically pulls new leads from Airtable, extracts valuable insights via Dumpling AI, and communicates the results directly to your chosen recipients. Let’s dive in.
Step 1: Set Up Airtable Trigger
- Create an Airtable Connection
In Make.com, create a new scenario and add the Airtable: Watch Records module. - Configure Airtable Details

- Set up the Base as “leads capture” and View as “Grid view”.
- Choose Table 1 with Label Field as “Name” and Trigger Field as “Created.”
- Set Limit to 1 to only process one new record at a time.

Step 2: Setting Up the Dumpling AI Agent for Lead Processing
The Dumpling AI agent is central to this automation, as it processes lead details gathered from Airtable. To connect it, you’ll need to set up an agent within Dumpling AI and retrieve the Agent ID
Log into Dumpling AI and Access Agents
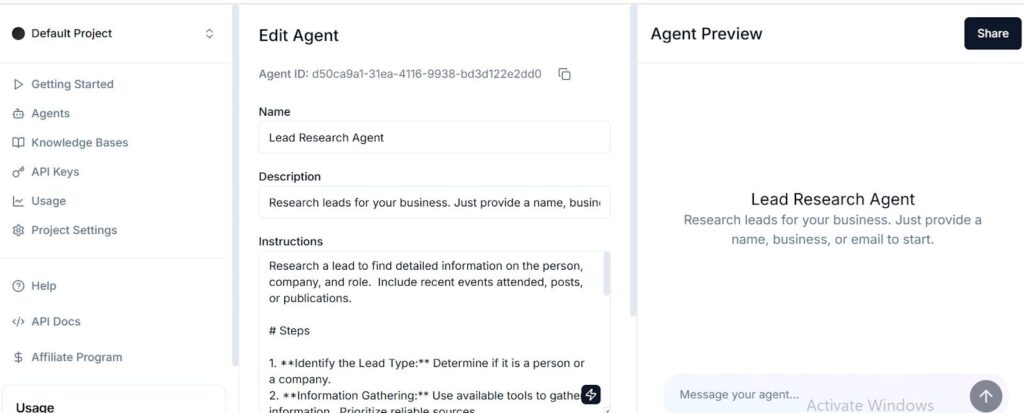
Go to Dumpling AI and log into your account. In the Default Project, navigate to Agents.
Select or Create a Lead Generation Agent
Under My Agent, you’ll find pre-made agent templates, including the Lead Generation Agent. Select this template, or if you wish, start from scratch to customize your own lead processing agent.
Customize the Agent (Optional)
Once you open the Lead Generation Agent, you have the option to edit it by setting specific data processing rules, text responses, or integration preferences. This allows for more precise data handling suited to your needs.
Retrieve the Agent ID
At the top of the agent’s details, you’ll see an Agent ID. Copy this ID, as it’s needed to connect Dumpling AI to Make.com.

Add Dumpling AI Module in Make.com
Return to your Make.com scenario and add the Dumpling AI: Generate AI Agent Completion module. This will allow Make.com to communicate directly with the agent.
Insert the Agent ID
- Paste the Agent ID from Dumpling AI into the Make.com module’s Agent ID field.
- This connection lets the automation pull data from Airtable and process it via the Dumpling AI agent.
Set Up Agent Messages
- Under Messages, click Add Item to create the data payload for the agent.
- Role: Choose “User” as the role, representing the user providing data to the agent.
- Content: Enter the dynamic data from Airtable that you want to process, for example:
“Name:{{6.Name}}\nCompany:{{6.company}}”
This allows the agent to process personalized lead details, and you can further customize this content with other Airtable fields as needed.
Enable JSON Parsing (Optional)
- Parse JSON: Toggle this option to Yes if you’d like to have the output in JSON format, which is useful for structured data retrieval and easier integration into further steps in the scenario.

Step 3: Configure Google Email to Send Results
With the processed data from Dumpling AI, the next step is to send this information via email.
- Add Google Email Module in Make.com
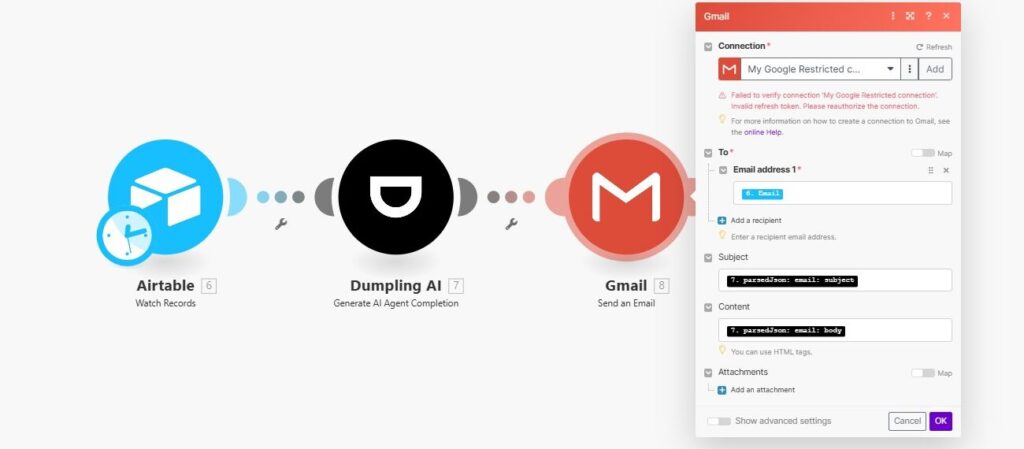
Add the Google Email: Send Email module in Make.com as the final step in the scenario. - Configure the Email Fields
- To: Insert the email variable from Airtable, {{6.Email}}, so the email goes directly to the lead contact’s address.
- Subject: Enter a descriptive subject line like “Lead Generation Result for {{6.Name}}” to keep the emails organized.
- Content: Set the body of the email using the processed output from Dumpling AI:
- Body: {{7.parsedJson.email.body}}
- Subject: {{7.parsedJson.email.subject}}

Final Step: Testing and Activating the Scenario
- Test the Scenario
Run a test to ensure all components are functioning as expected. Check that:- The Airtable module retrieves the correct record.
- Dumpling AI processes the data as intended and outputs the right response.
- Google Email sends the processed information to the specified contact.
- Review Output
Verify the email’s formatting, content accuracy, and that all dynamic data fields are being correctly populated.
With these steps completed, your automation will continually monitor Airtable for new leads, process each entry with Dumpling AI, and email personalized results to the lead, streamlining your lead generation workflow.
Get the Blueprint Featured in This Guide
Access the full blueprint here to get started on setting up this automation effortlessly!


